Back to CapitalForecastDirect Main Menu
User Role Descriptions & Adding a User
There are two different user roles in CapitalForecastDirect. Each role offers a different level of access in the system and will see slightly different views on their home page.
CapitalForecastDirect User Roles
Administrator
An Administrator has access to the entire system, including the Account Setup tab. They can update and run the model, create needs and work orders, add new users, and run reports. You can have as many Administrators as you need.
Site Administrator
A Site Administrator is assigned to a particular Location or Building. They can create needs, add and update building components, add and update equipment, and create work orders only for their assigned Location(s) or Building(s).
How to Add Users
- Click on the Account Setup tab.
- Click on the Users link under Required Settings.
- Click the Add New Item link above the right side of your users list.
- If you have users in other Dude Solutions applications, you will be directed to a Registered Users page. The Registered Users drop down list will show all users in other Dude Solutions applications that are not users in CapitalForecastDirect. If the person you wish to add is in that list, select their name and click Add This User.
- If the person is not in the list, click the New User button.
Adding Registered Users
- After clicking the Add This User button, you will need to select the Role for this user.
- Click Next Step to continue.
- On the Update User screen, the user's login name, password, and contact information will automatically be pulled from the information in their existing Dude Solutions account. The rest of the fields on this page are not required and can be added at any time.
- Click Save/Next Step to continue.
- If the person that you are adding is a Site Administrator, you will see one additional screen where you will need to assign them to a Location or Building. Click Save.
Adding New Users
- After clicking the New User button, you will need to select the Role for this user.
- Click Next Step to continue.
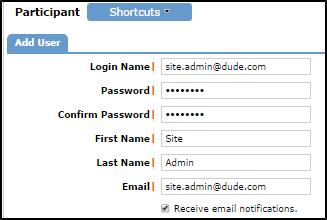
- On the Add User screen, you will need to enter a Login Name, Password, First and Last Name, and Email Address for the user account. Please make note of a few items when establishing a new user:
- Login Name - No character limit, but the name must be unique to all of our Dude Solutions clients. We recommend using the person's email address as their Login Name.
Password - Must be at least 12 characters long and include one mixed case character, one number, and one special character.
Email Address - If the user does not have a valid email address, create a unique email address using your organization's domain.
Receive email notifications - If the user does not want to receive any automatic email notifications, uncheck this box.
- Click Save. The screen will refresh to let you know that user has been added successfully.
- If the person that you are adding is a Site Administrator, click Save/Next Step and assign them to a Location or Building. Click Save.
